Showing posts with label Embellishments. Show all posts

Tuesday, 16 March 2010

Production Line Crafting!


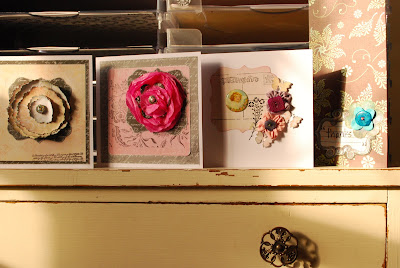
This is my pet project this year - you'll already be sick of me going on and on about preparing in advance lots of lovely embellishments ready to use, but it's so true, and to prove that I really do try to do it myself, I thought I'd share with you a picture of 4 pieces of scrapped post that I sent just before I dashed off on holiday.
It was a typical scenario in a loving woman's world, I needed to extend extra thanks to a friend who have given me a whole bag of plastic bags (now only us crafty chicks will know how exciting this really is!), a friend whom I'd not managed to speak to before I left, but wanted to let her know I was thinking of her, a friend who was going into hospital, and a new e-friend who had sent me a gorgeous handmade card from my previous blogs - you see what a nightmare! 4 cards all in the same precious half an hour to design and make!. Now I could have just left it, but I wanted to prove to myself that I can do cards quickly....so I used one of my new paper roses, put on my famous frame template = card 1, then I fiddled around with the same design but using tissue as well = card 2, then I use Oh the same famous frame template, ready made fabric flowers and already punched butterflies = card 3, then finally another stamped frame, mounted and stamped letters thanks, got a ready made paper and button flower - Yippee, only about 30 mins later, all made, written, stamped the envelopes, wrote out and put my 4 large 1st class stamps on and posted on my way to do the school run.
Actually the biggest pleasure?? knowing that 4 wonderful ladies were going to receive something I'd handmade just for them - imagining their faces when they saw a handwritten letter come across their mats, and more importantly 4 wonderful ladies knowing that I cared!
Getting prepping lovelies!!! and hit your postboxes!
x

Wednesday, 24 February 2010

Sneak Peak for Scrap Saturday!


Thought it would be great to share what we'll be up to at my Scrap Saturday workshop this weekend. We have a full house so will be guaranteed to have a lot of fun. I've designed layouts with the new High Tea range, which has been fabulous to actually get a chance to really play with. Obviously I can only sneak peak a couple of the embellishments from the layouts, 'cos my ladies love a surprise! I'll upload the whole layouts on Sunday once everyone has made them.

Wednesday, 17 February 2010

Tiny Treasure Boxes

Yippee I managed to get a background on my blog - actually was really easy when I just applied by frazzled mind to it...what do you think?

Had the luxury of a whole day off to spend with Hols and girlfriends. We started the day with a long walk stopping (of course) half way for coffee and cake!


Whenever I meet up with friends I love to find the time to make a little gift to take....especially when they are scrapbook nuts like me! Here is what I made my Havant pals today...tiny treasure boxes, perfect for keeping little things in. I made them from two large match-boxes stuck together and then covered in a new High Tea paper. I then fished in my box of pre-made paper and button flowers (definately make up embellishments like this in advance as its so cool to have them at the ready for moments like this!), and choose favourite ones to put on the top.

I then wrapped them in cellophane and put curling ribbon on....they didn't open them there and then, so I hope they love them.

Hope this inspires you to make tiny treasures for friends

Monday, 15 February 2010

Heart with Wings!


Couldn't resist the best day in the year to celebrate my love of hearts by making a heart with wings. My lover was really good and pretended not to see me making it as he whizzed past my office saying "I'm not looking, I'm not looking", and then seemed really surprised when he got a cute postcard with a big X on it. I haven't really shown you anything I've been up to with the new Delish collection High Tea, not because I haven't wanted to, but because I can't seem to hold onto the product long even to actually have a play - it's flying out the door (maybe thats where the heart with wings came from LOL). I used the High Tea Entree and Main Dish papers to do my heart, wings and background, and then one of my old favourites Peppercorn's Hor d'oeuvre for the mounts. I then used the new High Tea rubons, seals and pearls and gems to decorate the heart, and then embossed a little script onto the wings. Whole piece is roughly around 4x6" - a new favourite size of mine as you can make lots of postcard size pieces ready for cards, mini albums or onto your layouts. I like working in smaller sizes as I find the designs come easier when I'm not faced with a huge piece of 12x12 paper.
Of course you can't do valentines day with something sweet, so we had special cupcakes (not made this weekend I'm afraid, Mr Marks and Mr Spencers baked them especially for us)- how cute are these!

XOX!!!!

Monday, 25 January 2010

Painted Postcards & Vintage Tags!

Whizz...well that was the weekend then! I can't quite believe its over already! We had a great time at Scrap Saturday, and I enjoyed welcoming 3 new clients. I love seeing people go away totally inspired and ready to scrap their precious moments. We played with sandpaper this weekend - a really simple medium I sometimes forget to use. Its quick and easy, very portable and cheap to add to your tool kit (just don't tell your hubby that you've nicked a bit of sandpaper from his precious hoard of bits to use sometimes - can't imagine keeping things that might come in handy (LOL) boys ah!!!).


I just love these vintage labels, and have used them on layouts, cards, and even stuck them into books when I give them as a present.

Simply choose your favourite paper - pretty muted florals or neutrals look fab and cut to 8cm x 6cm. Sand the edges all the way around, then use any journalling stamps in your stash. I've layered two of mine here, a frame stamp and then another quote line clear stamp over the top - I love nice straight lines to rubon titles onto which I've done here. I then sewed a button on with pretty contrasting cotton. Next make a mount out of card or I used a Delish Peppercorn Treats paper because I love the way the black sands off well. Cut this about 8.5cm x 6.5cm and stick on your label - Wooo Hooo you are done. This is a great project to make in a little production line so you have a goregous little stash of labels whenever you need them.

We also got out our watercolour pencils - again another love of mine to keep in the toolbox. We used the Delish Peppercorn Buffet paper and cut out the floral boxes, painted in the flowers, then stamped a post card stamp, script stamp and a floral stamp all overlapping onto the front. I then used small alphabet stamps to put on my title. Have a go at colouring in again - its so great for bringing out the inner children in us all.


I'm very excited this week, as later on I'm rushing into the office to inspect all the new High Tea collection that has landed - new website about 95% there - so I'll let you know as soon as it's live and you can see and buy the new collections!

Have a great day!
Related Posts Plugin for WordPress, Blogger...