Tuesday, 26 October 2010

Cutest Tags

I so enjoyed making "fat birds" this summer and have used them on so many projects, that this Christmas I decided we definately needed a bird. Simply find a template that suits your style and make lots of bird bodies. I inked him and then stamped some flourishes and some script along the botton. Next I hand-drew a wing (several times till I got it right...don't panic if you make a few!), which I then cut out of another Christmas paper. I then punched a small 1" circle and sewed a pretty festive button on with glitter thread (in the workshops we referred to this thread as "swearing string" as it was awful to get through the button without fraying!!!). I then popped this button circle onto the wing, which glues onto the bird. Perhaps try making lots of bodies, lots of wings and lots of button circles and then put them together, its quite fun not to choose papers as you go as you seem to get more diverse designs when you make them a bit more randomly.

On the reverse of the bird, I simply stamped a blank frame so that I can write a message inside. I also think they would look gorgeous hanging from the tree, or hung in a window to welcome people to your house.

Have fun!
x

Monday, 25 October 2010

Find your Tag!

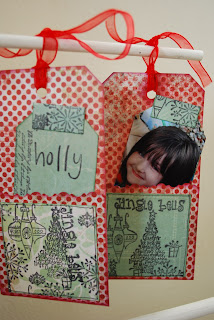
Wanting to always try and make mini scrappers celebrations even more special each year, especially as I'm becoming very conscious that she is getting older and start to panic about how long the magic will last....only for a moment though as this week I was speaking about family traditions with my lovely creative clients who reassured me that their children (how all grown-up some with children themselves)..still return home to enjoy their mothers' magic ways...what a wonderful thought that my mini scrapper will do the same.

So, this year she will need to crawl under the tree and find pictures of herself to identify her parcels..hoping to do this for other family members to...now just to find photos of everyone!

x

Wednesday, 20 October 2010

Fa La La


Here's another idea for your Christmas Card Design, simply make sweet bunting triangles from your favourite Christmas papers (or indeed green and red papers) and stick onto ribbon. You might want to try little stamps or rubons onto some of them. Make enough to go across your card size twice. Next stamp a simple tree or any other Christmas stamp you have, I've also added a little flourish to fill a little more white space. Stick on your bunting and yippee a nice modern twist to Christmas this year.

Have fun!
Why not make extra for a page layout?x

Sunday, 17 October 2010

Christmas is Near!


So, let's get busy with Christmas! I've now got my ladies all geared up, designs in hand, and hopefully off to a good early start to making their own Christmas decorations and cards. If you are like me every year you plan to do everything handmade and gorgeous, but simply run out of time and then nip to M&S and buy their goodies..well remember my focus this year has all been about "production line" crafting? ie; make in advance, do lots of little lovely projects over and over so that you can then simply put all the elements together and have wonderful finished items to be proud of..now has never been the more perfect time to start this habit. I'll show you lots of ideas this week to get you inspired!.
xx


For this card, I've simply cut a triangle off the front of the card, and covered in paper as well as the inside. Take a frame shape (or diecut if you are lucky enough to have a clever machine) and mount on your favourite cardstock. Make a small parcel embellishment, add a tag and some ribbon and bling and stick onto your frame mounts. Then stick this half way across the triangle front cover. If you have really colourful paper, simply leave the inside front cover of the card to write your message.

Monday, 4 October 2010

Vintage Mini Album


Following on from my sneak peaks earlier this week, here is the finished project that I designed for a group of lovely ladies in Reading. I had such fun seeing them all enjoy this workshop, and was glad I wasn't the only one who swore just a little when making these ribbon roses!

Think the best tip I shared on the day was to remember that you can stamp in layers to create a great effect...on this vintage title label I first stamped a frame, then stamped some script over the top, then stamped the lines, then stamped 2010...so in fact I used 4 stamps to create this vintage label. Try this technique if you haven't already, you'll be amazed how much more life your stamps will have.

Have started to think Christmas...I know I know it seems way too early, but if you don't decide what your homemade card designs are going to be, then you'll never get them finished. I also try to design 2 or 3 as I get a bit bored making the same ones over and over...I'll show you what comes off the drawing board when I teach my first Christmas class tomorrow.

xx

Friday, 1 October 2010

My Favourite Boy


Do you design the layout with or without the photo??? Lots of people that I teach ask me this all the time, and to be honest I tend to design my layouts without any particular photos in mind as I need to make sure that they will suit everyone's photos not just the ones from my collection. This was very much the case of the layout above, which actually was based on this gorgeous apple template that I used on my apron in the summer. I then realised that I couldn't easily give this paper a title due its lovely blackness, so I simply sanded off a little area and stamped Adored over the top. I then followed through by sanding a border around the edge about 1" inch from the sides. For a simple and really quick layout I actually love it...I then found of of my favourite photos of my boy which just fitted perfectly (and a great reminder to me that actually it would have been quite hard to design a whole 12x12 around a tiny old black and white photo)..love a man in uniform!!

Give this layout a go..well the sandpaper bit anyway, and just use a shape/template that you love in a lovely contrasting paper where the apple is.

Off tomorrow to show some ladies how to make a gorgeous little vintage album..here is the sneak peak images they have been sent...will show you the whole thing after the weekend.

Keep creative
xx
Related Posts Plugin for WordPress, Blogger...