Tuesday 21 December 2010

Painted Pillowcases


When I was asked to be a creative muse for a mummy friend (who was the bravest woman out there with six 8year girls coming for a stay-over!) I was of course delighted!

She asked me to come with some ideas for making the party memorable...so I got some plain white pillowcases and used my stash of "big" template letters and drew the girls initials on with fabric pens. I then sewed on little heart jewels to get them started. Tied with cotton twine and of course couldn't resist a personalised label...how sweet do they look!

The girls were really excited and spent an hour or more happily decorating their very own pillowcase. After they were ironed to set, they all used them that night, and then left with their pillowcases filled with party treats to take home (ie; the pillow case then acts as the party bag).

Thought maybe this might make a great "christmas eve" present for your little ones to do, and keep them distracted for a moment or two from the presents under the tree!

Sleep tight!

Saturday 11 December 2010

more advent calender treats


well I can't quite believe I'm still managing to think up a new paper treat each day for mini scrapper...need to get busy tomorrow and make a couple more days in advance.


Hope you enjoy!

xx

Tuesday 7 December 2010

Wedding Invites Go on Show!


How exciting when I received two emails today, one from the fabulous photographer Lisa Devlin who shot her friend's wedding in Brighton last month, and then from Katrina the bride herself, who we did her invitations and table settings for.  How cute do these look!!! I'm so pleased that everyone loved them as much as we did designing and making them....just couldn't wait to share with you all!


If you would like to see the whole wedding simply follow this link to Lisa's site and go under November 2010 to Katrina and Alistairs wedding.

xx


Monday 6 December 2010

two more little surprises

Dec 2nd and 3rd see a couple more surprises for our handmade advent calender for mini scrapper. We also now have our wonderful advert house filled with little sweets and chocolates from Grandmas too, but it seems the handmade version is going to be required for each day as it is becoming a favourite.

Dec 2nd is a small lime green card and velum envelope (no of course I didn't make the envelope - give me a break!)...just happened to find them in my "spare envelope and little card" box!! he he


Dec 3 sees my famous and much loved "fat bird" being made into a christmas robin of a "debs sort". Actually I think he looks kinda neat....might make some more to go with my other bird parcel tags this year. Definately worth looking at your templates and simply changing the patterns and colours into the Christmas theme.


Check in for the next couple of days surprises in the morning!
xx


Thursday 2 December 2010

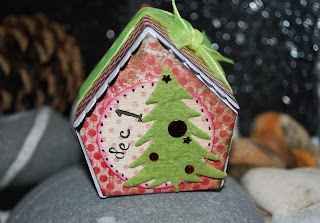
1st dec!


1st december came yesterday along with the first of the snow for most of us - what a wonderful way to start celebrating this festive month!...along with advent calenders mini scrapper remembered me. My brillant mum-in-law always has this in hand and fills all the grandchildrens calenders each year...well that is if the parents climb into the attic and find them!...was all planned until my boy got stuck in snow for 20 hours!!!!, so no fear mini scrapper understood that she'd simply get hers a little later and would have 2-3 pockets to open in one go. 

Now I should have been satisfied with this plan, but as the boy and I picked her up from brownies last night we got all romantic and decided she should really have a calender on the 1st, so went through the snow to tesco, then co-op, then the garage - all sold out!!! oh no she had got really excited by now...so not to be beaten creative mummy magic ran upstairs and produced a present for dec1 - horrah all was wonderful in our world again...until mini scrapper said "oh mummy its amazing, can you make me something each day - I love your homemade presents" yikes now I have 23 more to produce...so watch this space. (if you love these amazing little home sweet home diecuts I've just put them on my website under diecuts 5 for £2.45!! - wouldn't they be gorgeous for your table decoration this year!!!) Siuply follow this link;
http://www.thescrapbookcompany.co.uk/shop/Die-Cuts/Mini-Home-Sweet-Home-Diecuts/prod_117.html

Is anyone else doing this crazy task...or indeed making an album for december - let me know. I'm going to simply take a picture of each day's advent and make an album or double page spread out of the photos - like I haven't got enough to do - oh well wish me luck

Hope you are remembering to take lots of snowy shots! 
x

Tuesday 30 November 2010

Fabric & Ribbon Christmas Tree


Thought I'd share this cute fabric and ribbon Christmas Tree card with you. Simply collect all your favourite ribbons, fabrics, bling and get stickin'. Just make each stripe slightly shorter and graduate up till you reach the top of the tree. Add buttons, brads, any jewel bling for the very top. You can also use small stamps to decorate your tree. Once you've glued in place, try sewing a line down the middle to add some depth.  I've used a cool little topiary stamp (just hid the tree) to get the pot planter - you could also draw one or make a paper template and cut out little planters in pretty papers.

Have fun!
x

Monday 29 November 2010

True friendships don't mind!

The Three of Us!

I felt I should start this post with an apology seeing as that I didn't blog much in November...then I stopped myself as why do I need to feel guilty? As woman we are simply too hard on ourselves..it's not like I didn't think about it, wish I could find the time to write, it's just a normal case of busy person bug that we catch very regularly throughout the year...so to all my true "girlfriends" reading this blog I know you won't mind, cos true girlfriends really understand and don't take it personally! I love you all even if I can't tell you every minute!!!...please take this tiny piece of wisdom with you through December because I just know you'll all face this dilemma on probably more than 1 day before Christmas!

Ok, so what have I been doing...well I got another year older, mini scrapper is now a blue belt at Karate and is also doing extremely well with her new brace (very proud parents at how well is is coping!), had a crackin' Scrap Sat, went away with scrappin' girlfriends and played with distress inks and glimmer mists for hours and had so much fun!!!, nursed my boy through another horrid cold, started shopping for Christmas gifts, booked a little more of our big trip home, and generally worked worked and fell on the sofa at about 9pm each night! How about you?what did November bring to your door?

Thought I'd share the layout above with you today, not just to give you another quick and easy layout idea, but also to see if like me there are photos in your stash that you don't really like (too fat, squinty eyes, horrid top)..but that actually are quite important - the picture in the layout above is of myself, my sister and my much missed Mum...(unfortunately on the morning of my Dad's funeral), but only 1 of a very rare photo of the 3 of us so I decided to use it with lots of really pretty paper and simple handmade embellishments, like the bird cage so I'm happy with the design, and actually now really ok with the photo for what it captures - The 3 of us!...go on be brave and use those photos you keep putting back!

xx

Wednesday 17 November 2010

Wally Sneaks Home!

                                               
How cool was this to come home to after a wonderful weekend away scrapping with girlfriends. Yes...Wally sneaked home, planted himself with lovely limey greens and white lillies and hang himself above our fireplace.  I do love it when my boy gets "handy" (around the house).

We have now had our shipment in of Woolly Pockets which is very exciting and the reaction we are having to them is fantastic. I still can't believe they are only £34.99 - so girlfriends if you want an amazing present for Christmas for yourself or for loved ones, just check out my boy's website http://www.gardenhousedesign.co.uk/ or ask for me for details when I see you.

Have also just done some fab new 12x12 vintage layouts for classes so will sneak peak soon

Have fun!
x

Wednesday 10 November 2010

This year gift vouchers are ok!

whatttt I hear you say...me the queen of "can't stand gift vouchers"...well that's not actually true, I love gift vouchers when you have to actually take the time to go into the choosen shop..be inspired by all the goodies in them and then think "oh how lovely that my friend will get to spend her voucher in here".  You see why I'm not so keen nowadys, is that you can simply buy them when you are doing your weekly shopping at the supermarket or you've nipped into WHSmith for a paper - it just dosn't seem right!!! am I alone on this one???

Anyway vouchers and gifts of money certainly still need to play a part in our Christmas shopping lists, so when I saw these really cute money and gift voucher wallets the Martha Stewart website, I just couldn't resist making them - this way I feel that the receiver knows they have definately been throught about and should feel loved in a special way just as they should be! have fun - warning they are quite addicitive so be prepared to make them just for fun!

xx

For the money wallet cut a strip of paper 8" x 4" and fold in half. Taking a contrasting paper, simply cut a 2" strip and glue over the fold to bind your wallet. Next use a thin ribbon and tie around the middle - (this can then have money folded and slipped inside, or a lottery ticket, or even a little note of where to find a wee present. Decorate the front to your heart's desire - I've just used simple flowers punched and stamped in pretty contrasting colours.

If you want to make a gift voucher wallet, simply cut your paper length to 10" (x 4") and fold in 2" and glue at just the sides to make a slip in pocket.

Friday 5 November 2010

Wally keeps me busy!!!

ok, so I could use up half this blogging session apologising for not keeping my blog up to date, but hey why not just come straight to and let you know it's all because of Wally!

Now he's kinda cute, totally recycled, and hangs around either indoors or outdoors...hope he doesn't just drive you up the wall....yep it's Wally, a fabulous new concept for making living walls or wall gardens in your own home and garden.

As you all know my real job is as the Marketing Manager for my boy's company, and as part of that role I am tasked to source great new products for us to use in our designs and also to sell on-line...so here he is;


The new Woolly Pocket range of products, which are basically felt bags (called Wally1, Wally3 and Wally5) that you hang on the wall and fill with your favourite plants...and the best bit is they simply start at £34.99 how cool is that. A fabulous Christmas present for anyone that loves plants. Don't forget you could also plant with herbs or vegetables or salad stuff as well. If you want to see more details and some amazing images of how others have used their Wally's then simply click through to our website http://www.gardenhousedesign.co.uk/.


...as for finding time for making other creative little lovelies, promise I'll show you some more things I've been up to over the weekend!

have fab fridays!
x

Tuesday 26 October 2010

Cutest Tags

I so enjoyed making "fat birds" this summer and have used them on so many projects, that this Christmas I decided we definately needed a bird. Simply find a template that suits your style and make lots of bird bodies. I inked him and then stamped some flourishes and some script along the botton. Next I hand-drew a wing (several times till I got it right...don't panic if you make a few!), which I then cut out of another Christmas paper. I then punched a small 1" circle and sewed a pretty festive button on with glitter thread (in the workshops we referred to this thread as "swearing string" as it was awful to get through the button without fraying!!!). I then popped this button circle onto the wing, which glues onto the bird. Perhaps try making lots of bodies, lots of wings and lots of button circles and then put them together, its quite fun not to choose papers as you go as you seem to get more diverse designs when you make them a bit more randomly.

On the reverse of the bird, I simply stamped a blank frame so that I can write a message inside. I also think they would look gorgeous hanging from the tree, or hung in a window to welcome people to your house.

Have fun!
x

Monday 25 October 2010

Find your Tag!

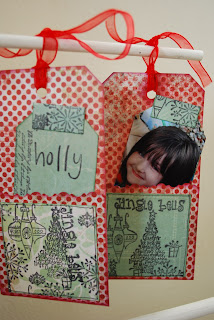
Wanting to always try and make mini scrappers celebrations even more special each year, especially as I'm becoming very conscious that she is getting older and start to panic about how long the magic will last....only for a moment though as this week I was speaking about family traditions with my lovely creative clients who reassured me that their children (how all grown-up some with children themselves)..still return home to enjoy their mothers' magic ways...what a wonderful thought that my mini scrapper will do the same.

So, this year she will need to crawl under the tree and find pictures of herself to identify her parcels..hoping to do this for other family members to...now just to find photos of everyone!

x

Wednesday 20 October 2010

Fa La La


Here's another idea for your Christmas Card Design, simply make sweet bunting triangles from your favourite Christmas papers (or indeed green and red papers) and stick onto ribbon. You might want to try little stamps or rubons onto some of them. Make enough to go across your card size twice. Next stamp a simple tree or any other Christmas stamp you have, I've also added a little flourish to fill a little more white space. Stick on your bunting and yippee a nice modern twist to Christmas this year.

Have fun!
Why not make extra for a page layout?x

Sunday 17 October 2010

Christmas is Near!


So, let's get busy with Christmas! I've now got my ladies all geared up, designs in hand, and hopefully off to a good early start to making their own Christmas decorations and cards. If you are like me every year you plan to do everything handmade and gorgeous, but simply run out of time and then nip to M&S and buy their goodies..well remember my focus this year has all been about "production line" crafting? ie; make in advance, do lots of little lovely projects over and over so that you can then simply put all the elements together and have wonderful finished items to be proud of..now has never been the more perfect time to start this habit. I'll show you lots of ideas this week to get you inspired!.
xx


For this card, I've simply cut a triangle off the front of the card, and covered in paper as well as the inside. Take a frame shape (or diecut if you are lucky enough to have a clever machine) and mount on your favourite cardstock. Make a small parcel embellishment, add a tag and some ribbon and bling and stick onto your frame mounts. Then stick this half way across the triangle front cover. If you have really colourful paper, simply leave the inside front cover of the card to write your message.

Monday 4 October 2010

Vintage Mini Album


Following on from my sneak peaks earlier this week, here is the finished project that I designed for a group of lovely ladies in Reading. I had such fun seeing them all enjoy this workshop, and was glad I wasn't the only one who swore just a little when making these ribbon roses!

Think the best tip I shared on the day was to remember that you can stamp in layers to create a great effect...on this vintage title label I first stamped a frame, then stamped some script over the top, then stamped the lines, then stamped 2010...so in fact I used 4 stamps to create this vintage label. Try this technique if you haven't already, you'll be amazed how much more life your stamps will have.

Have started to think Christmas...I know I know it seems way too early, but if you don't decide what your homemade card designs are going to be, then you'll never get them finished. I also try to design 2 or 3 as I get a bit bored making the same ones over and over...I'll show you what comes off the drawing board when I teach my first Christmas class tomorrow.

xx

Friday 1 October 2010

My Favourite Boy


Do you design the layout with or without the photo??? Lots of people that I teach ask me this all the time, and to be honest I tend to design my layouts without any particular photos in mind as I need to make sure that they will suit everyone's photos not just the ones from my collection. This was very much the case of the layout above, which actually was based on this gorgeous apple template that I used on my apron in the summer. I then realised that I couldn't easily give this paper a title due its lovely blackness, so I simply sanded off a little area and stamped Adored over the top. I then followed through by sanding a border around the edge about 1" inch from the sides. For a simple and really quick layout I actually love it...I then found of of my favourite photos of my boy which just fitted perfectly (and a great reminder to me that actually it would have been quite hard to design a whole 12x12 around a tiny old black and white photo)..love a man in uniform!!

Give this layout a go..well the sandpaper bit anyway, and just use a shape/template that you love in a lovely contrasting paper where the apple is.

Off tomorrow to show some ladies how to make a gorgeous little vintage album..here is the sneak peak images they have been sent...will show you the whole thing after the weekend.

Keep creative
xx

Monday 27 September 2010

Birds


I love to see if I can spot trends and get inspiration through window shopping and their displays...great excuse to get into the high street as well. Quite often I take my camera so I can capture displays that inspire me...see this gorgeous bird cage in a window in Brighton. I'm thinking they have simply made the cage out of wire and then wound lengths of fabric around it. They have then put pretty birds on the perch....now cute would this look in your home!!! ...... now look closely at the photo again, and you'll spot my poor bored daughter in the reflection, doing that "omg mum's taking photos of windows again" look....only spotted this when I downloaded the photos today...did make me laugh!

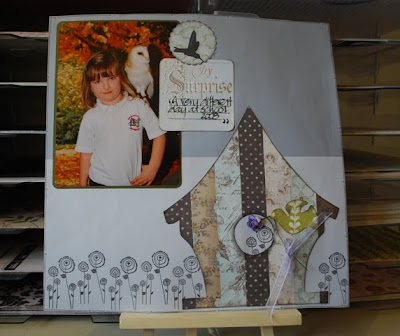
This layout is therefore perfect to share with you on the theme of birds and bird cages or houses in this case. I simply made a template and then used stripes of pale blue and brown papers to cover. I used a small floral stamp for the bottom border and also in the door of the birdhouse. I then made a small bird out of a really lovely lime green to contrast the paler colours and embellished with a flower and ribbon. Quite a simply layout but just right for a busy photo of mini scrapper turning up to school one day and being treated to an owl on her shoulder...she's obviously not that comfortable, check out the double chin as she tries to move away.

xx

Tuesday 21 September 2010

My Vintage Boys


Here is one of the layouts we did for our September Scrap Saturday...where we managed to do 6 layouts in the same session, some of my girls even finishing with photos - it was a busy, yet most enjoyable day!...

I wanted to celebrate scrapbooking journalling cards, as they are a little something that I love and buy often, yet they don't seem to have caught on here as well as I would have thought. They seem so easy to me...beautiful designed by talented artists with perhaps a title or journalling already on them. These ones are from my delish bistro range and are only 10p on my website in the sale. I've simply centred this layout around the journalling cards, and little extra's (postage stamp sticker, high tea seals - both delish), a paper rose and a small crown/flourish stamp. I didn't want to do much else with the actual photos as they were so beautiful all on their own.


In case you are wondering my vintage boys are my dad (top right hand corner) and my Uncle George on the bottom - how cute are they both!

Hope this layout inspires you to dig out old family photos!

x

Sunday 19 September 2010

Painted Mini Album


Sometimes an idea just works...(and sometimes it dosn't)...but when it does especially when I'm up against a tight deadline, it is extremely rewarding. This little painted mini album was one of those "yeah I love it" designs.

Simply cut a 12x12 piece of white cardstock into 3 equal pieces ie; 4x12".
Next fold each piece in half. Take your favourite watercolours and put a little wash of different colours onto both halves on both sides. Try watercolour pencils, watercolour crayons or watercolour paints.

Once dry follow this simple template;
draw a couple of lines around each edge to frame the paint colour. Next stamp favourite stamps onto each page in black ink. You can add other embellishments, ribbon, flowers, brads, glitter dust as you go along. I then choose a navy patterned paper and cut my photo mounts into 3x3" squares and sanded the edges. I placed one on each page so that I know exactly what space I have to play with when I put photos in. For the front page, I simply did a frame stamp and used alphabet stamps for the title. I then got a large bloom, painted the edges and finished with a favourite brad. Hey pesto a cute little album ready to fill with photos...perfect for a week gift album as well as its really cheap and easy to make.

Have fun!
xx

Tuesday 14 September 2010

Ssshh...sale has started with 50% off all Delish


Hi blog chicks, thought you should know before anyone else that I've just put all Delish Designs products into a HALF PRICE sale on my website...so make sure you tell all your friends too!

www.thescrapbookcompany.co.uk

I need more room so that I can buy lots more goodies, and thought it was high time that more of you got to enjoy using Delish at delicious prices.

If you are coming to any of my classes, then simply pop a note on the order and I'll make sure that I refund your postage when I hand your parcel over...remember you only pay postage on orders under £20 anyway.

Have fun shopping!

Monday 13 September 2010

Bird House Sneak Peak


Starting to design for this week's classes, and have finished off a design using a gorgeous bird house template which I've sneak peaked above. I used my favourite method of stripping matching papers (cut about 1") across the bird house and then distressed with nice dark ink. My birdy comes from a metal Christmas decoration that's been sitting in my "things to use" box for ages..think he's kinda neat and can see him being used in this year's Christmas designs.

...hhhm what to design next!

x

Thursday 9 September 2010

Anniversary


WOW we just celebrated our 10th wedding anniversary yesterday, I can't believe how quickly the time has gone by and all the wonderful things the last 10 years has brought, no 1 our precious mini scrapper.

So...of course my dining room mantelpiece, which I love to theme and decorate to the occasion/event/craze/idea that we are doing in our home at the time, has changed to gorgeous hot pink flowers and our cards...and yes before you look too closely I cheated and bought a card from WHSmith (but its a cool vintage photography one that I'd love to copy).

We had a lovely supper with mini scrapper, and then as is our tradition got out our wedding album...not scrapped I hasten to add! I then got our wedding memory box and we looked at all the bits I had saved from our wedding weekend and our honeymoon, my tiara, my stockings, the boy's flower, papers bought on the day, menus etc...I then made a collage of these precious bits and took this photo for my 2010 Album - why not put together a collection of favourite things and take some photos - its such fun!

Spending the day in London with my boy tomorrow, which is fabulous. Hope you all have wonderful weekends!

x

Tuesday 7 September 2010

Fit for a Wedding!


Have been madly finishing off wedding invitations and place setting cards for a lovely Brighton Bride, and have really enjoyed how they have turned out.

I love making my own paper flowers, and for these ones, I've simply punched two flowers out the same size, and then lightly stamped a big rose over the top. Lightly ink with black around the edges. Stick the 2 together so the petals are overlapping, bling with a little glamour dust, and put a tiny flourish stamp in the middle. How cute are they going to look when you sit down for dinner!

Here's another design with another stamp idea. Definitely worth using for you own dinner parties!...and I'd love to make the flowers are table confetti...remind me that when I need to do hundreds for an event 'cos they take ages!

x

Thursday 2 September 2010

New starts!


Wow my mini scrapper is really growing up as she went off today to her new Middle School, tie and all! Didn't seem too nervous, just excited to see her friends, and ready to start a new adventure of learning...very proud moment when I took pictures this morning, but still can't quite believe its 4 years since the last set of "first day at school" shots...where does time go?

Continued with my new start for September when I went back into the office today, and cleared out lots of files, and made lots of new ones...just the stock room to go and I'll be rearing to get started on Monday.

...only down side to clearing, is sometimes you still don't find what you are looking for...have misplaced two stamps which is really frustrating me, hopefully they are just stuck to a block somewhere..off to continue searching now. Any good ideas for clear stamp storage??? please share as I'm finding that the plastic bags and sheets they give you when you buy them are fine to start with then become really annoying sticking together when you are trying to get the stamp away...so I don't and then I can't find things..arrrgghhh

x

Tuesday 31 August 2010

Inspired to Paint


Back to reality after a wonderful break in Germany with friends. Ate far too much delicious food and enjoyed doing very little which is very unlike me, but think I just needed to relax. Mini scrapper rode horses, swam in a fresh lake and enjoyed homemade ice cream.

The lovely family we stayed with had these wonderfully simple yet gorgeous paintings on the wall that I would love to go have go at painting/scrapping. I like the simple detail they have added to the windows to give them some depth, and imagine what fun you'd have with colour choosing what shade to do each house in....I can feel an idea for a page coming on.

Last couple of days with mini scrapper before she stays her new big school..how every exciting! I also feel ready to tackle more projects for work and creatively. I needed some time off designing as its really hard coming up with new ideas all the time, but are looking forward to getting stuck in for September classes.

1st of September tomorrow and I'm also feeling really pleased that I've managed to get lots of cupboards cleared, have thrown out lots of "might be useful one day" piles, so I can actually see what I have...very good for the soul...just the dreaded tupperware cupboard to go (simply can't stand opening it each morning for school and swearing as everything falls onto my my feet!).

x

Sunday 22 August 2010

workin' 9-5


If on the odd occasion, I doubt doing what I'm doing, living our life the way we do, then I simply have to see what a lovely life mini scrapper has being the kid of self-employed parents. Sure we work really long hours, and she's expected to understand when she needs to be as quiet as a mouse when the phone rings, or find a quick snack herself when dinner is postponed because we are trying to hit a deadline. But on the whole she gets to see the both of us more than a lot of other children. During the holidays we are blessed with our amazing family agreement where we all simply chip in to look after the children. A lot of the time mini scrapper still chooses to be with me even if that means working with me. Sometimes it's easy because she simply helps with my scrapbooking designs, or if its a day when I working for the boy then she comes to the office with me. This was the case on Friday where she stayed with us all day and helped us lots...hence the careful dyson(ing) of the doorstep!....then the favourite part of the day finally came, when she was allowed freedom in the yard with us packing up for the day.........

locking the gate - swing style!

checking the skip is not too full

putting the vans away!

just so glad I had my camera to capture her excitement of memories I'm sure she'll remember till she has her own children maybe coming to work with her for the day!

Happy days!

x

Sunday 15 August 2010

September is the new January!


With the end of Summer holidays just 2.5 weeks away, I've realised that I really need to get a move on and do all the housey things I planned at the beginning, so we have been really good and have done lots of spring-cleaning and throwing out! We started in mini scrappers room, moving things around and sorting toys and keepsakes into easy to find boxes...she's definately my daughter desperate to try and keep everything, 'cos it might come in handy...and also because she is happy to have everything in cool boxes sorted and neat (well Mummy is really pleased anyway).

As this has been the focus of our weekend, I've wonder if for most families, especially women actually September is really the start of our new years, new school years, new uniforms, new routines, not January at all which simply depicts a new calender year...hhmm liking this idea a lot!.....also of course it means that anything we need to change in terms of thinking, any negativity that I don't want to carry into 2011 can be sorted well in advance so that I'm ready to start 2011 in a better frame of mind.

So I've planned next week to continue this cleanising and sorting process and be really ready September well in advance!

...will let you know how we get on....
x

Thursday 12 August 2010

Sewing Class No 3


BooHoo our classes are finished, but WOW what an amazing time we had at the Eternal Maker - thanks to the girls for all their hard work and amazing projects. I really enjoyed learning myself, and its actually made me realise what value I hopefully bring to others when they come to my workshops - makes all my hard work designing and prepping all the more worthwhile...definitely going to try and keep up the allocated "me" time when things go back to normal after the summer holidays.

So what did we make? well as you can see mini scrapper is showing off her amazing Paris Reversible Tote Bag - making every bit herself! and there is mine above - hot pink and ready for summer - actually I've sent it my dear friend who needs a "sunny" parcel to arrive on her doorstep - hope she likes it!

We also made purses in the morning, where I re learnt the joys of "zips"..very pleased with my bag, and of course had a little spare time and a basket of scraps next to me, so made this cool fabric flower and decided to sew it onto a brooch clasp so that I can have it on my bag, or indeed wear it - very chuffed!

Now all I have to do is convert these new skills into more projects made at home, and also introduce more sewing into my paper projects...watch this space.

xx
Related Posts Plugin for WordPress, Blogger...